







Permitted development does not remove Building Regulations duties. This guide explains which acoustic requirements loft conversions, extensions and changes of use trigger, and when testing or a noise assessment is needed.
- 7 Minute Read
DIY acoustic panel installation: a step-by-step guide
Swift by Songbird is a 40mm fabric-wrapped acoustic panel with a self-adhesive backing. No drilling, no fixings, no installer required: peel, position, and press. It achieves Class A sound absorption, the highest performance classification

Adam Martin
16 September 2026
Categories:
Acoustic Panels, DIY Installation, Room Acoustics
Quick Take
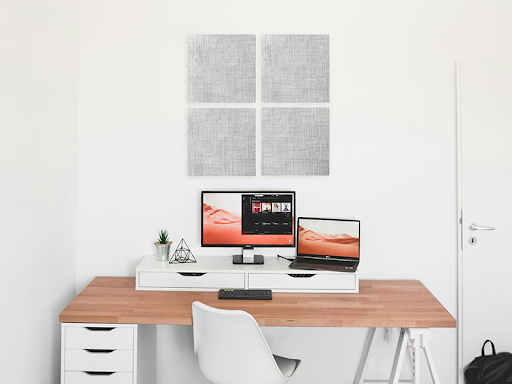
Swift by Songbird is a 40mm fabric-wrapped acoustic panel with a self-adhesive backing. No drilling, no fixings, no installer required: peel, position, and press. It achieves Class A sound absorption, the highest performance classification available, and works on walls and ceilings. Here is the part most people get wrong: the biggest factor in a good result is not the panel, it is where you put it. Panels placed at the first reflection points on the side walls, behind your speaker or microphone, and on the wall facing the sound source will beat the same number of panels scattered randomly around the room, every time.
Who this guide is for
Acoustic treatment is one of the few room improvements you can genuinely do yourself. You do not need a specialist, a big budget, or a toolbox. You do need the right product and a basic grasp of where panels go, and that is what this guide covers.
It is written for a few different people with the same problem. Home studio users trying to kill recording echo. Homeowners stuck with a loud, boomy room, usually an open-plan kitchen, a hard-floored living room, or a home office. Small business owners who want a meeting room, therapy room, or consultation space that does not sound like a bathroom. Podcasters and video creators chasing cleaner audio without gluing anything permanently to the wall. And renters who cannot drill and need something they can take down again.
By the end you will know what panels can realistically do, how to plan a scheme, how to prep the surface, how to fit the panels step by step, where to place them, and the mistakes that cause most of the failures.
One thing this guide does not cover: soundproofing between rooms. Acoustic panels do not stop sound passing through a wall, floor, or ceiling. If your problem is a noisy neighbour or footfall from upstairs, panels will not fix it, and it is better to know that now than after you have bought a boxful.
Before you start: if your goal is to stop sound moving between rooms rather than improve the sound inside a room, panels are the wrong tool. Read our guide to the difference between sound absorption and sound insulation first, and if you are treating a floor or wall, do you simply add mass to soundproof it? sets out what soundproofing actually involves.
What acoustic panels actually do
Every hard surface in a room, the walls, ceiling, glass, and hard floors, bounces sound back. Each bounce is a reflection, and reflections pile up into reverberation: the echo that makes a room sound loud, muddy, and hard to record or work in.
Panels absorb that sound energy instead of reflecting it. Fewer, weaker reflections mean a shorter reverberation time, so sound dies away faster. Speech gets clearer, recordings get cleaner, and the room becomes more comfortable to sit in. If you want the underlying theory, our overview of the principles of building acoustics goes deeper, and the comprehensive guide to acoustic wall panels covers panel types in more detail.
What panels will not do is worth saying plainly. They will not stop sound travelling through a wall, floor, or ceiling. They will not tame low-frequency bass buildup on their own; that needs bass traps, which are deep, specialist products for room corners. And they will not make a room silent.
What you can expect from a well-planned job is a noticeably drier room, less flutter echo (that fluttering ring you hear when you clap in a bare room), clearer speech, and cleaner recordings. Getting there comes down to placement more than anything else, which is why sections six and seven do the heavy lifting.
Swift: the self-adhesive Songbird panel
The thing that sets Swift apart is how it goes up. It is a 40mm fabric-wrapped acoustic panel with a factory-applied self-adhesive backing. Peel the backing, position the panel, press it home. No drilling, no rawl plugs, no fixings, no tools.
That convenience does not cost you performance. Swift achieves Class A sound absorption, the top classification under EN ISO 11654, which means it soaks up the large majority of the sound energy that hits it across the frequencies that matter for speech and music. You are not trading acoustic quality for an easier install.
Swift comes in standard sizes and fabric finishes. It does not offer bespoke sizing or the wide colour range you get from Skylark or Warbler, but for most DIY jobs, home studios, home offices, meeting rooms, standard sizes are all you need.
Swift is a good fit if you are renting and cannot drill, if you want a fast clean result without turning your room into a building site, if you are treating a rented office or meeting room, if you run a home or podcast studio and want improvement without an installer, or if you simply want to test treatment in a room before committing to something permanent.
It is the wrong choice in a few cases. If you need bespoke sizes, look at Skylark or Robin. For high-traffic spaces where panels take knocks, such as schools, gyms, and sports halls, Warbler is built for it. And very large commercial projects that need a fixed panel specification for design or regulatory reasons are better served by a specified installation.
Explore the Swift panel for standard sizes, fabric options, and full technical specifications.
Before you start: planning your installation
Spend five minutes listening to the room before you buy anything. Clap once, sharply, and listen to how the sound decays. A long, fluttery tail tells you the room is reverberant. Talk out loud and notice any harshness or muddiness. That is the room telling you how much work it needs.
Then measure it: length, width, and ceiling height. Those numbers decide how many panels you buy and where they go.
As a rough starting point, covering 15 to 25 percent of the total wall and ceiling area will make a clear difference in most rooms. Treat that as a guide, not a rule. Rooms with very hard surfaces (concrete, bare plaster, lots of glass) or big volumes need more; rooms with carpet and soft furnishings need less. For a typical home studio or meeting room around 4m x 4m x 2.5m, 12 to 20 standard panels (say 600mm x 600mm) gives you a meaningful treatment without going overboard.
You do not need to cover every wall. Start with the minimum, place it well, and add more if the room still needs it. Under-treating and topping up beats over-treating and living with a dead, lifeless room.
Your shopping and kit list is short: Swift panels (order ahead and allow for delivery), a tape measure and pencil for marking, a spirit level (optional, but it keeps rows straight), and a few clean dry cloths for prep. That is it. No tools, no separate adhesive, no fixings.
Surface preparation
Surface prep is the step people skip, and skipping it is the single most common reason panels fall off later. A dropped wall panel is wasted money. A dropped ceiling panel is a hazard. Ten minutes of prep avoids both.
Swift bonds well to smooth painted plaster, smooth painted plasterboard, and painted MDF or timber panelling, which covers most UK homes and offices. Some surfaces are a no. Wallpaper is a poor bet, because the adhesive grips the paper rather than the wall and both tend to come down together. Bare or textured surfaces reduce the contact area and weaken the bond. Brick or blockwork only works if it has been well sealed and smoothly painted. Glass is possible but not ideal, so test a small area first.
Here is the routine:
- Clean the surface. Wipe the wall with a clean, damp cloth to lift dust, grease, and any loose paint, then let it dry fully. Adhesive does not grip damp or dusty surfaces. On kitchen or bathroom walls, use a mild cleaner to shift grease or condensation residue, then go over it again with a dry cloth.
- Check for loose paint. Press firmly and look for flaking or peeling. Stick a panel onto loose paint and you will likely pull off panel and a disc of paint together. Sand any loose areas back and seal with a suitable primer if needed.
- Check the temperature. The adhesive bonds best at room temperature, ideally above 15°C. Do not try to fit panels in a cold garage or outbuilding in winter without warming the space first. Both the panel and the wall should be at room temperature.
- Give it time. After cleaning, leave at least 30 minutes so the surface is bone dry before anything goes up.
Where to put the panels
This is the section that decides whether your treatment works. Placement matters far more than coverage, and it is not complicated once you know the trick.
The mirror trick for finding first reflection points
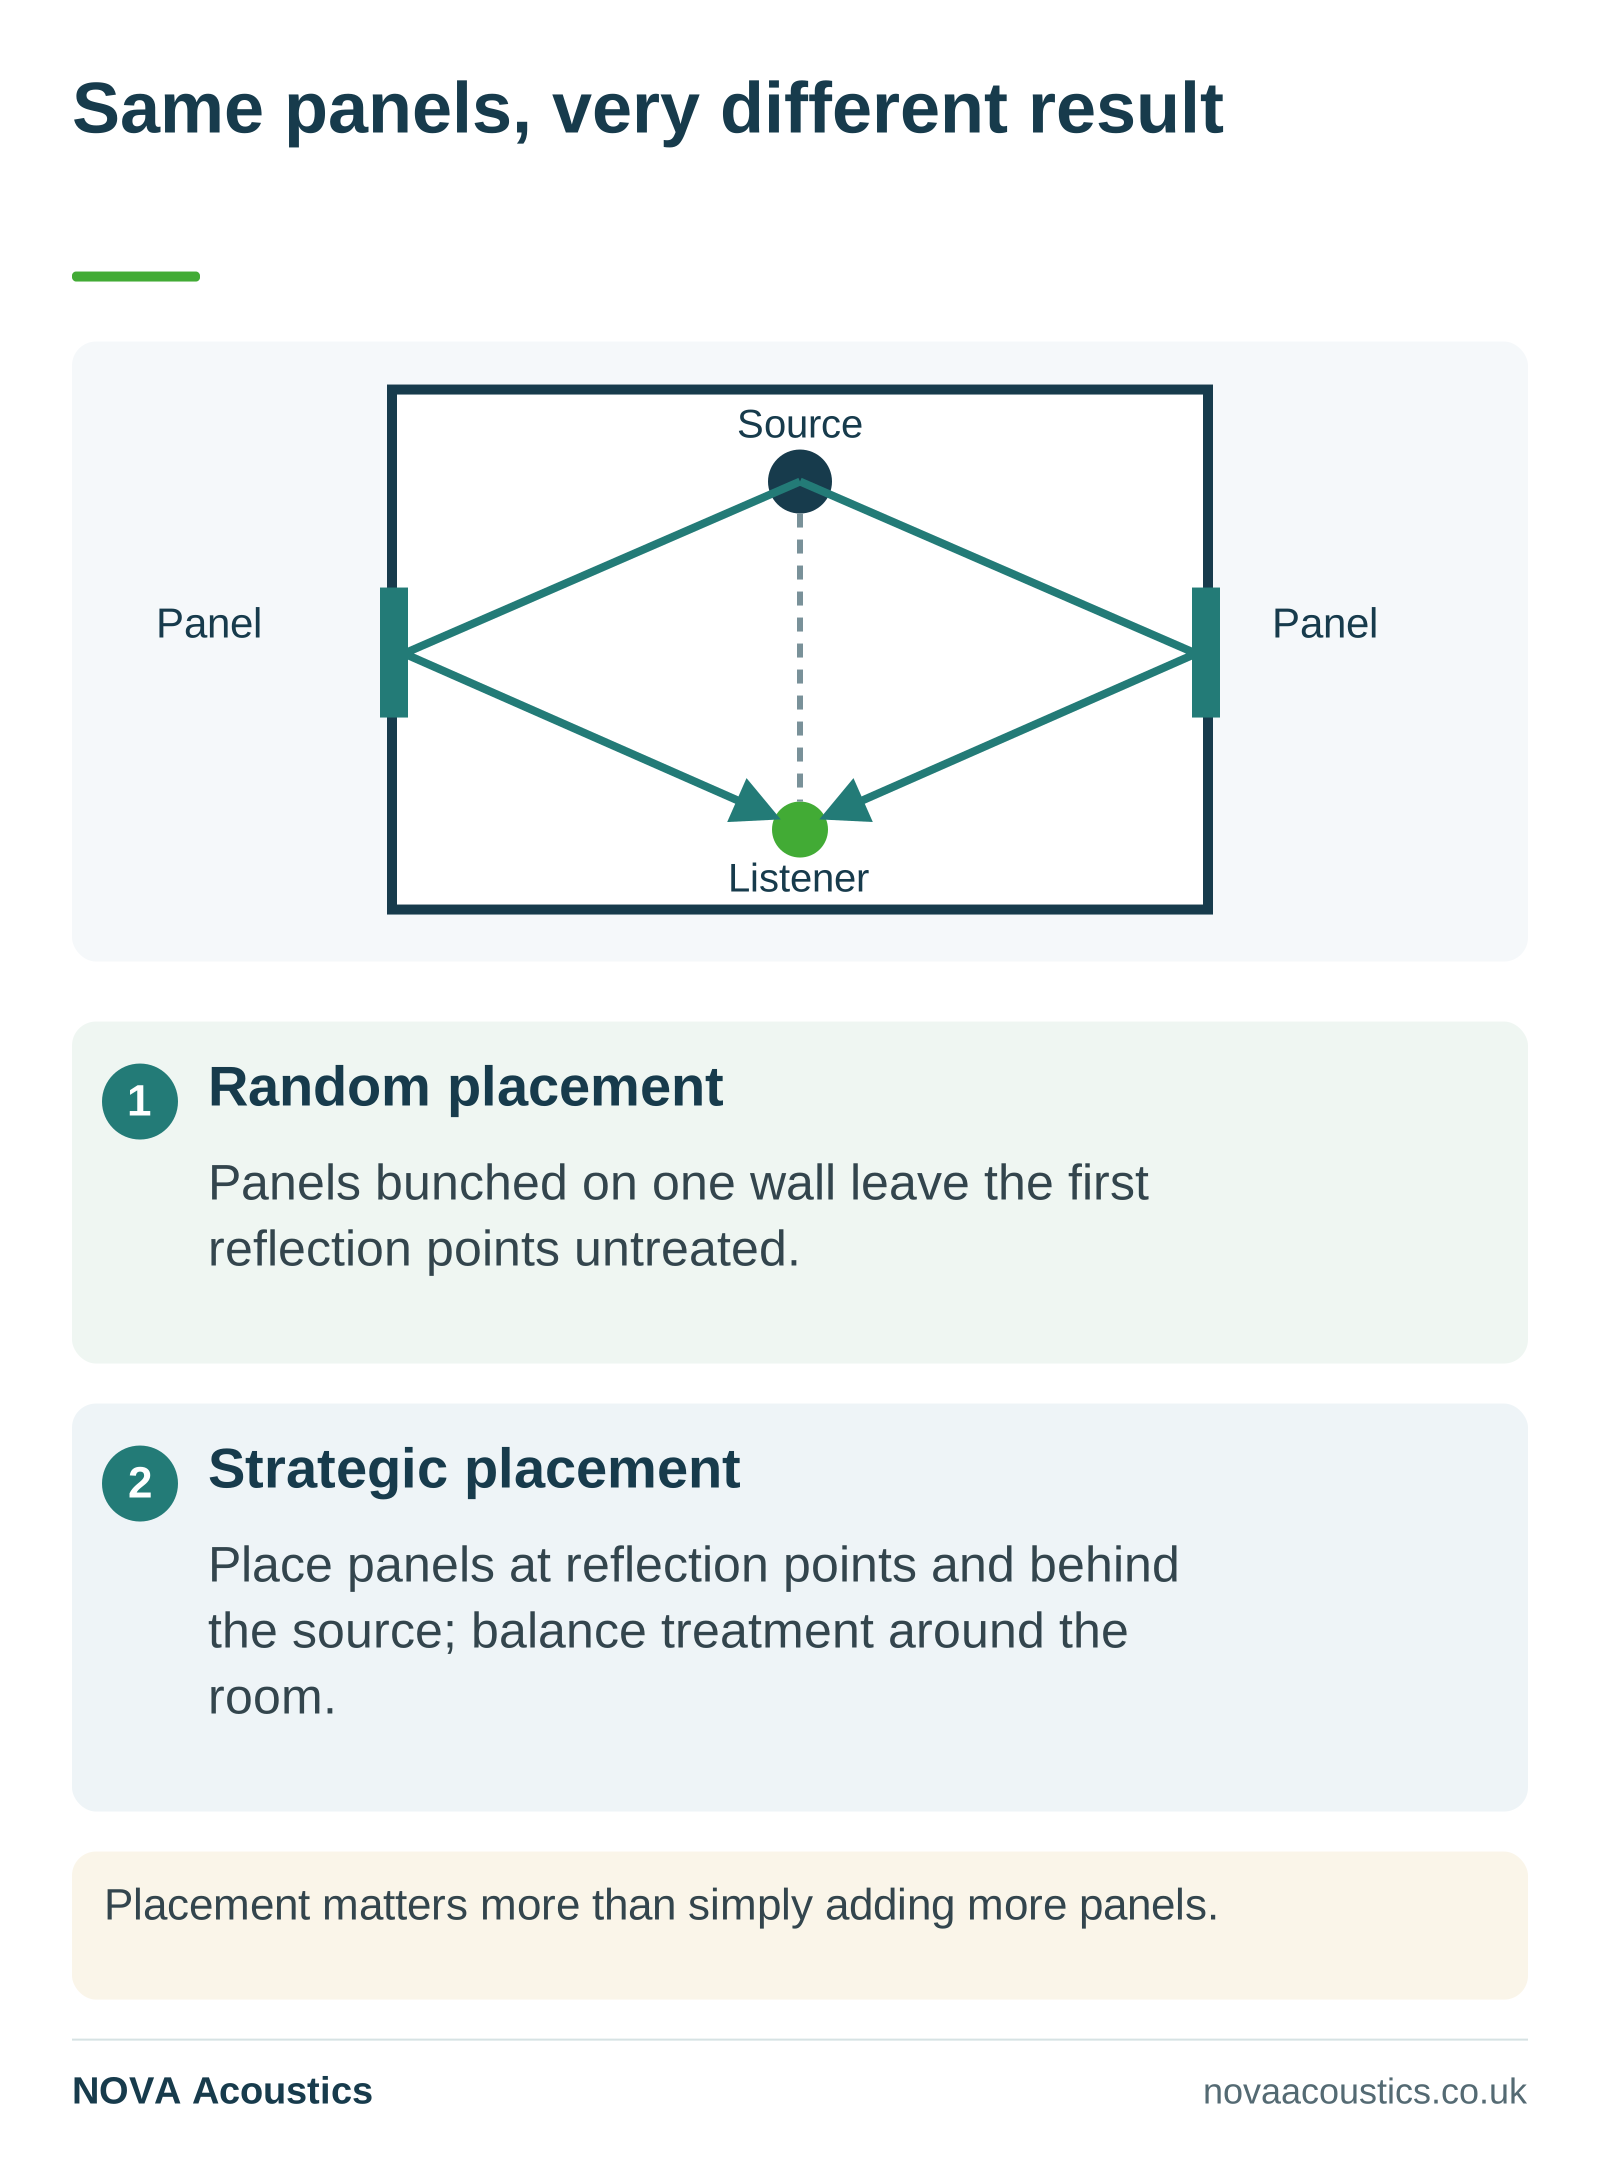
First reflection points are the spots on the side walls (and ceiling) where sound leaves your speaker or your voice, hits the wall, and bounces straight back to where you sit. They do the most damage because that reflected sound arrives a split second after the direct sound, smearing the audio and muddying what you hear.
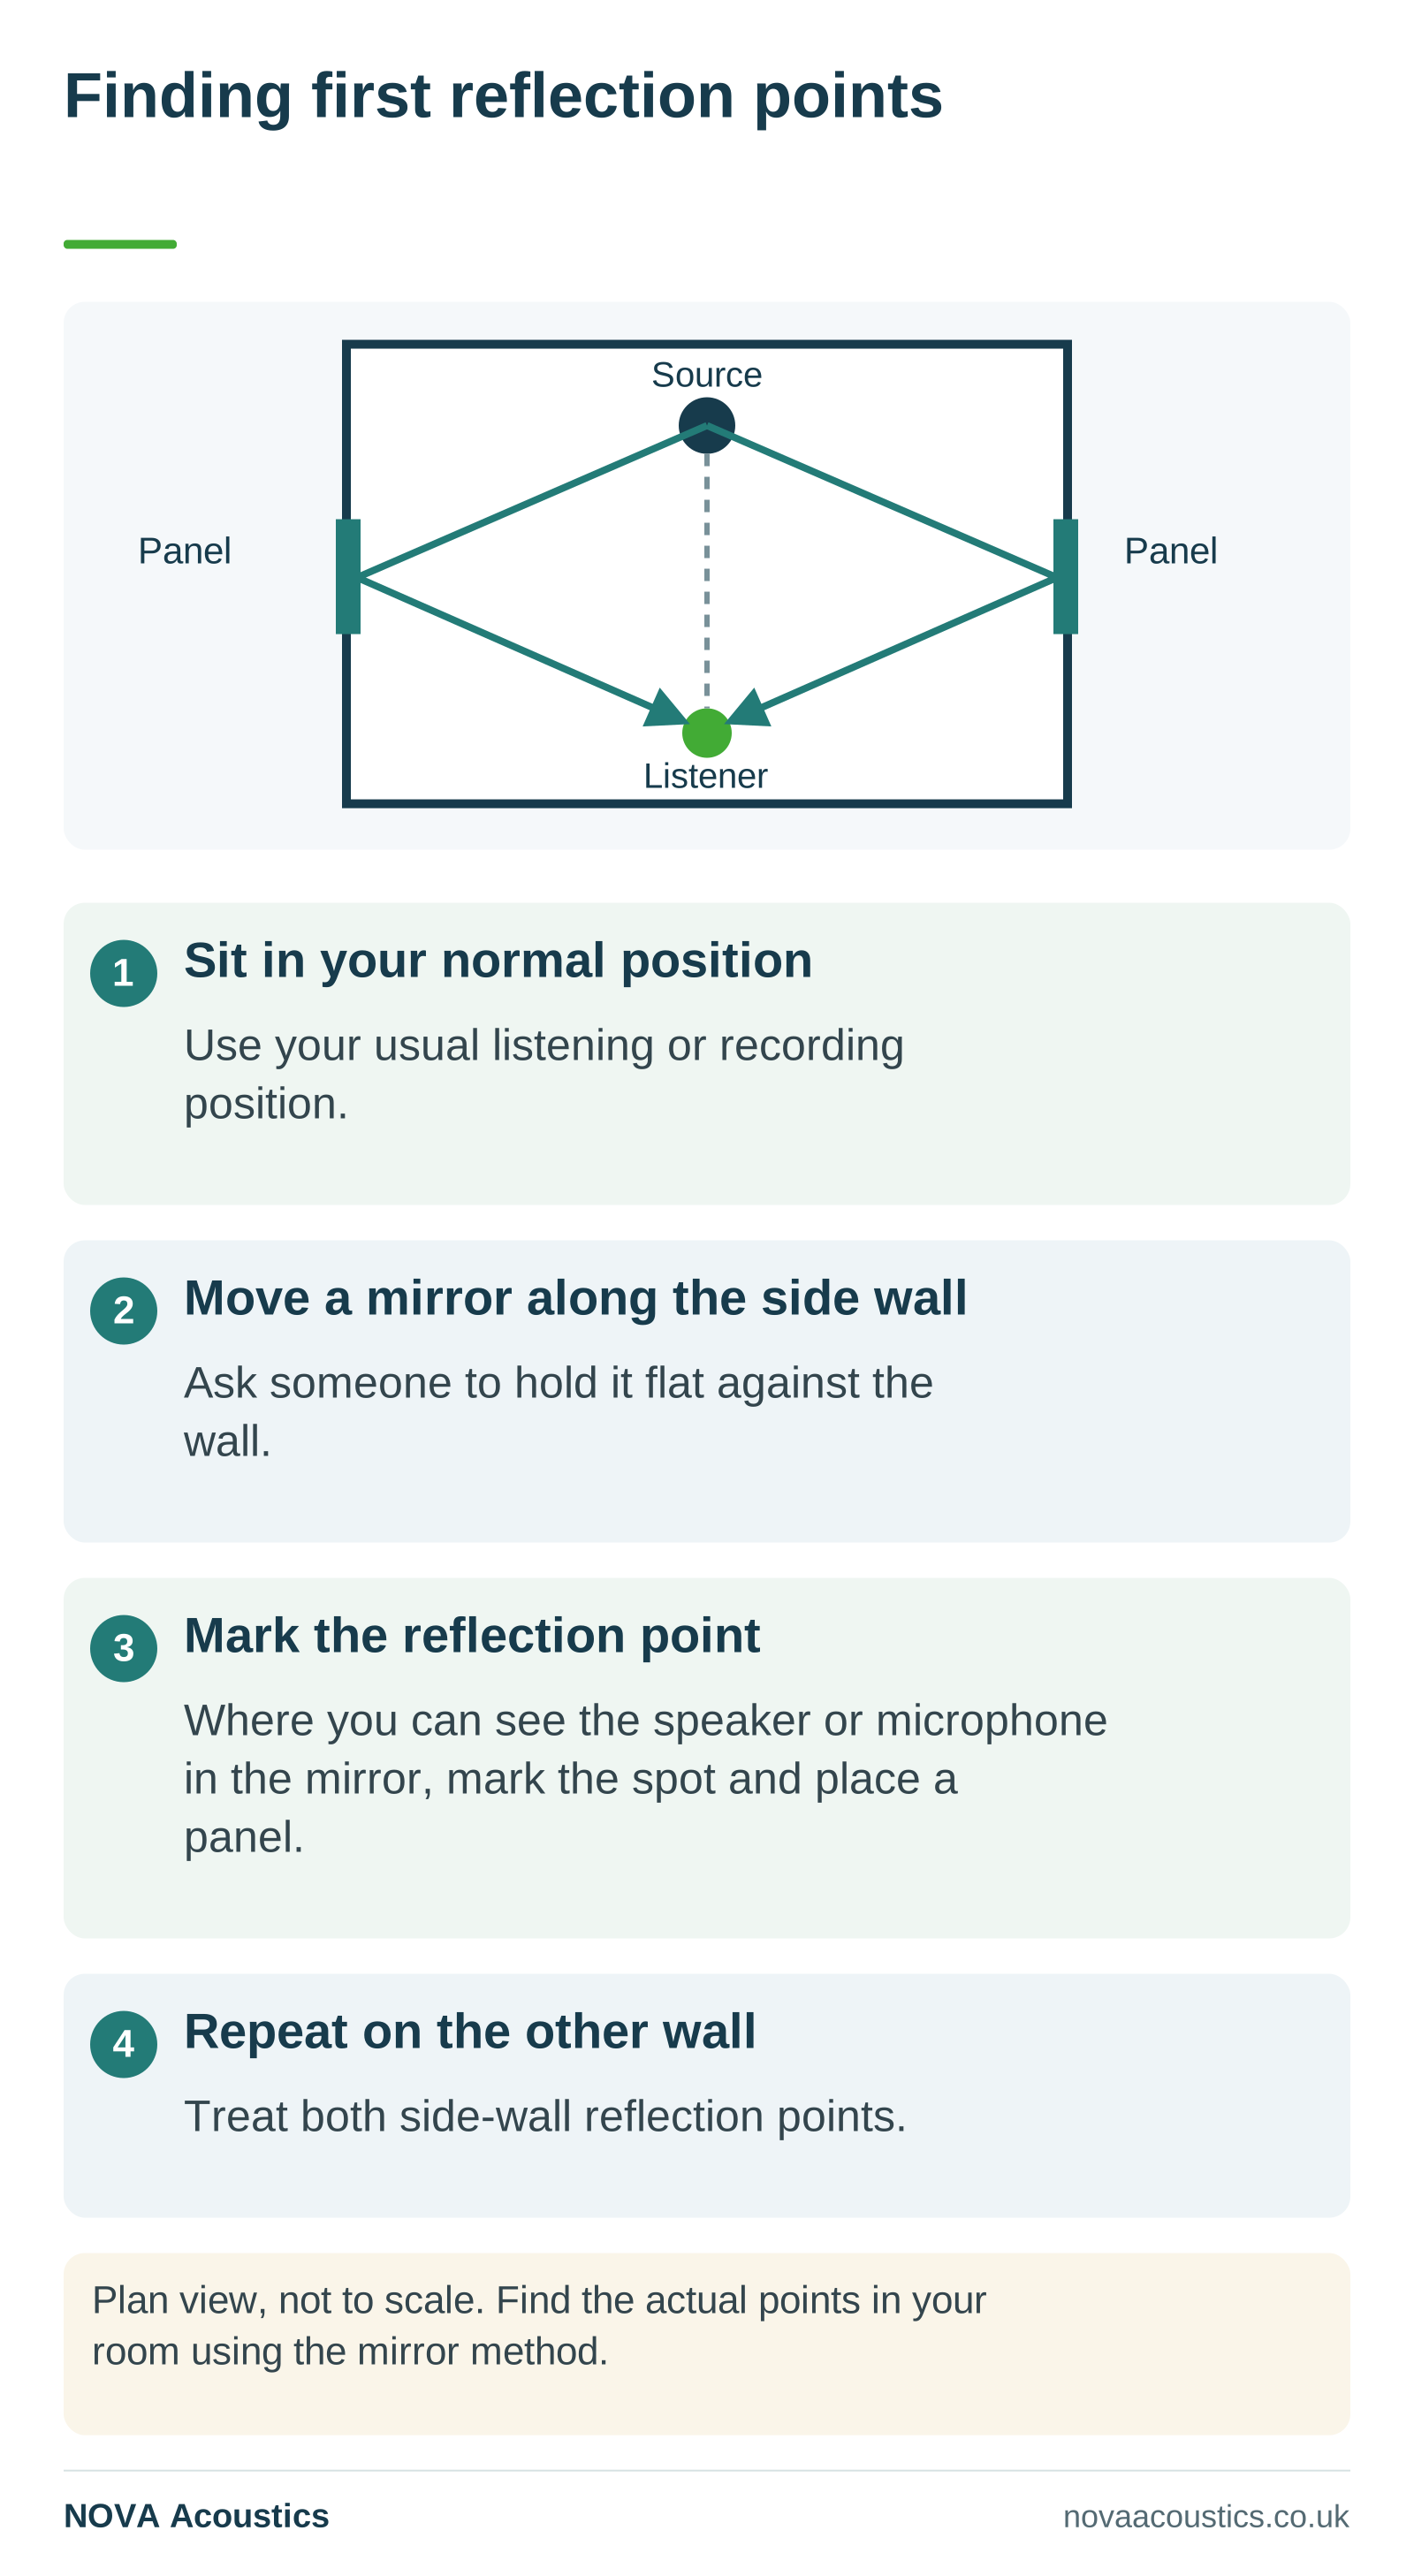
To find them, sit where you normally record or work. Have someone hold a mirror flat against the side wall and slide it slowly along the wall towards you from the front of the room. Wherever you can see the speaker (or, for a mic setup, your own mouth position) in the mirror, that is a first reflection point. Mark it, and put a panel there. Repeat on the other side wall. The same method works for podcast and video setups; your voice at the mic is the sound source.
Placement in priority order
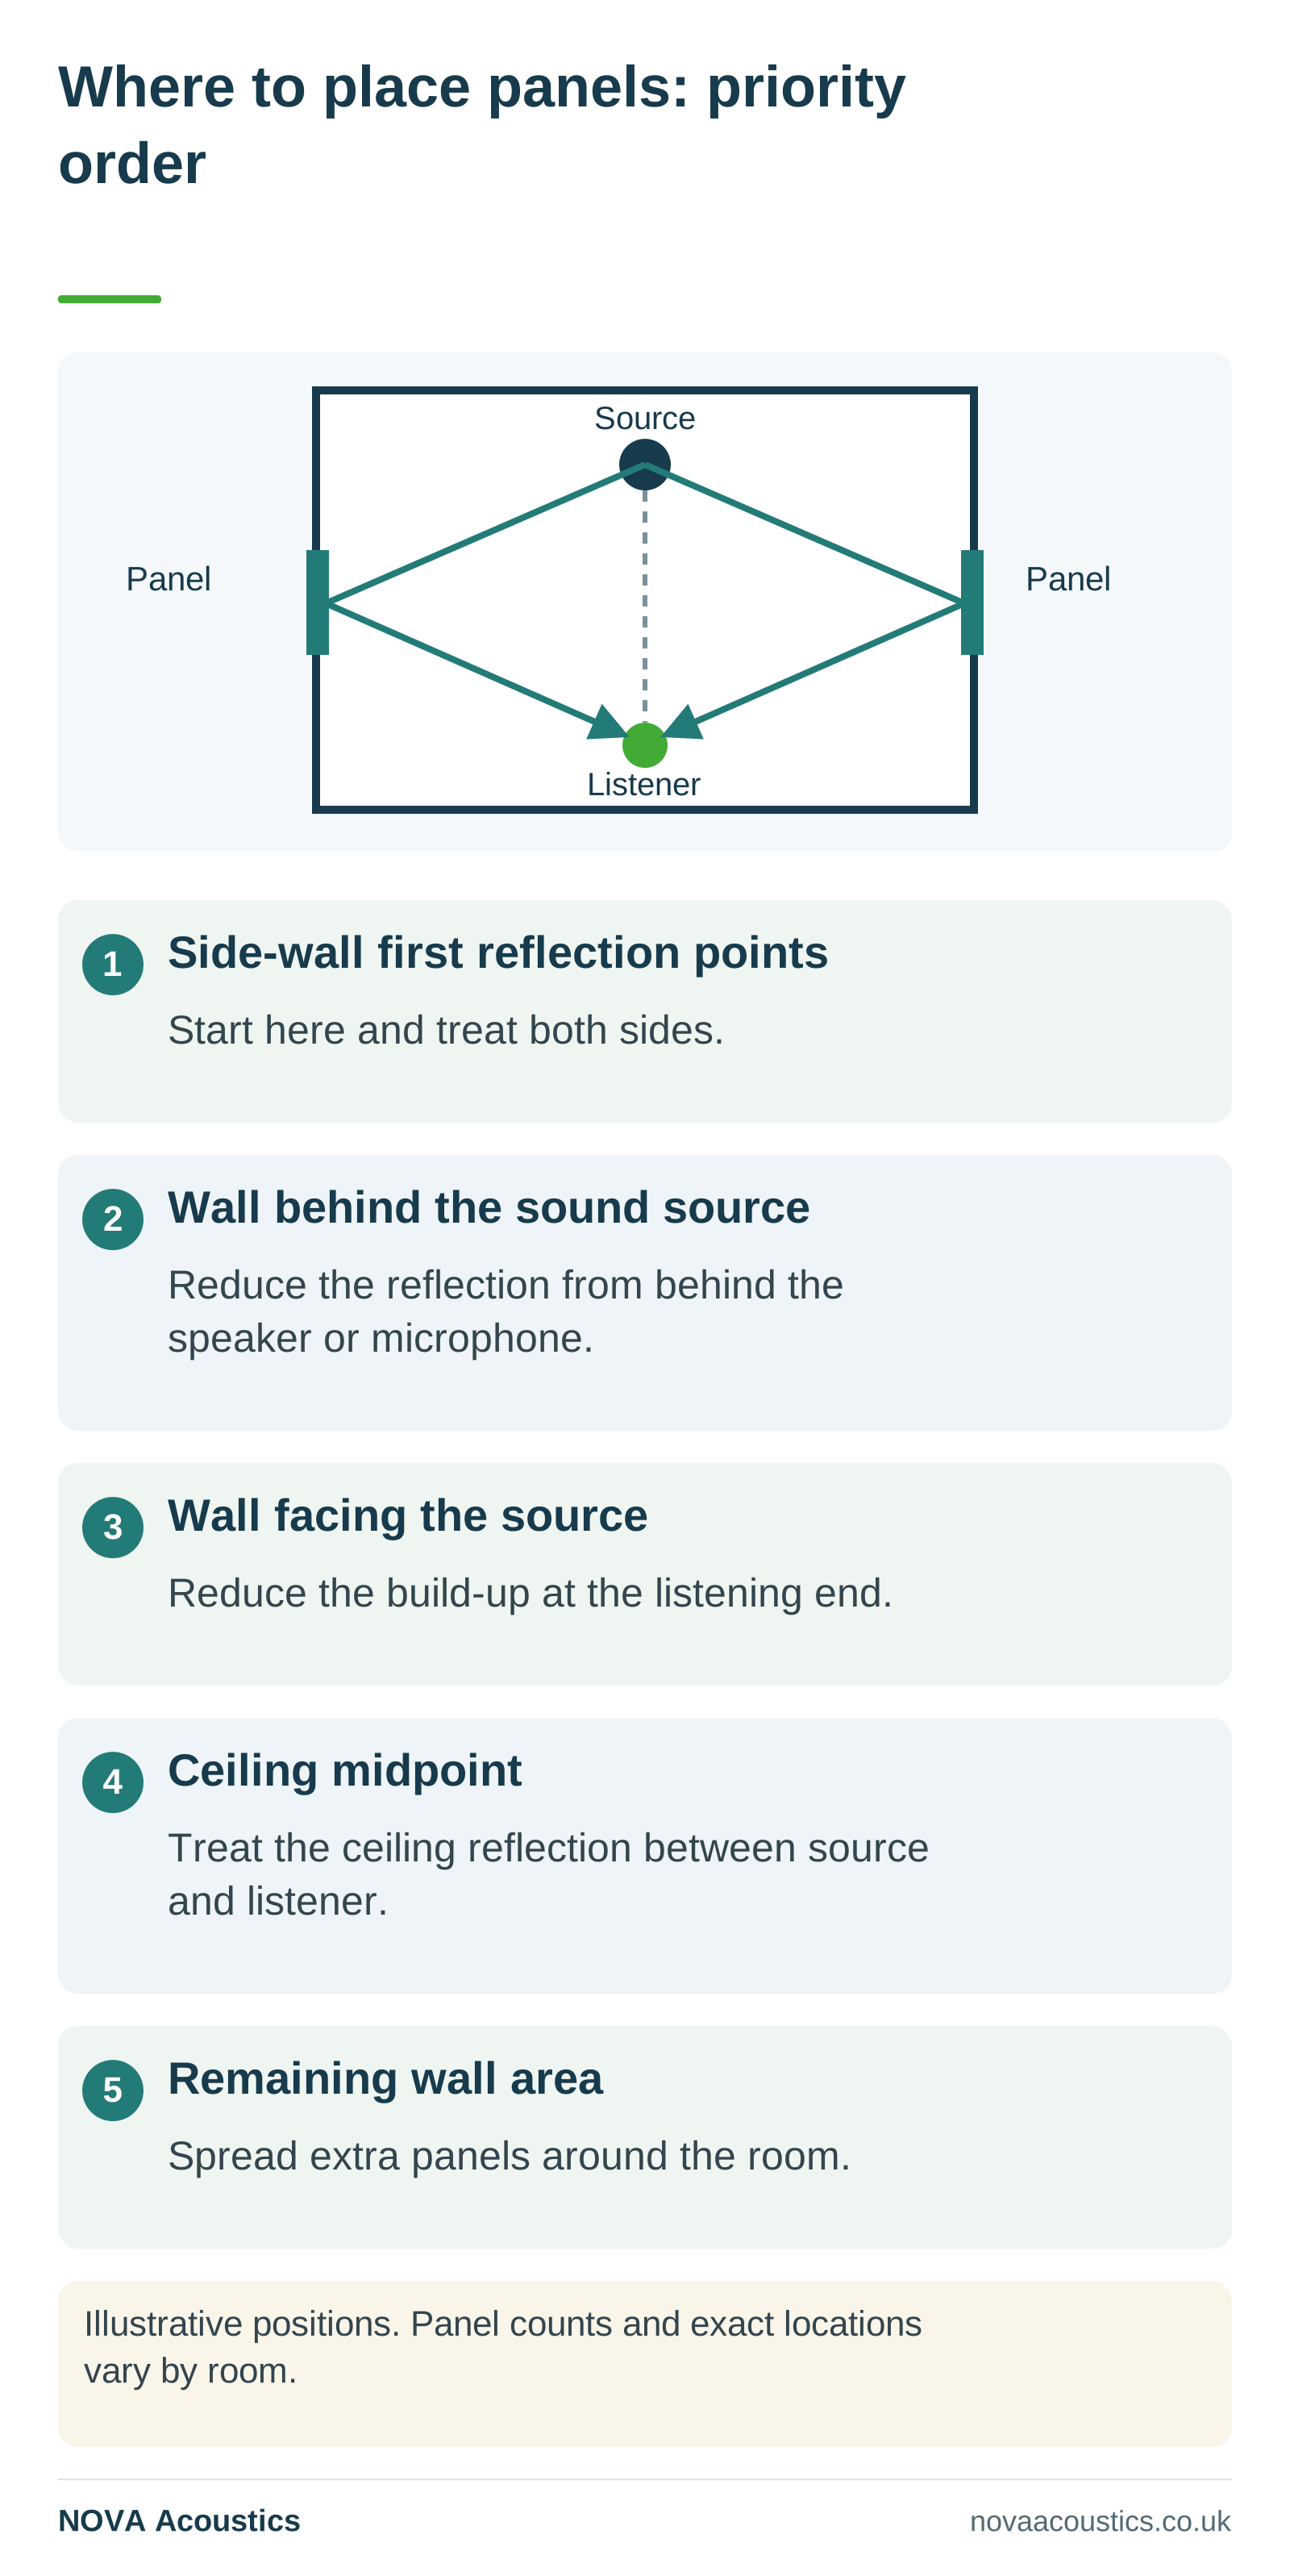
- Side wall first reflection points. These give the biggest improvement in almost any room. Start here whatever else you do.
- The wall behind the sound source. The wall right behind your mic, mouth, or speaker throws sound straight back into the room. A panel or two here cuts that reflection down significantly.
- The wall facing the source. The wall opposite catches the direct sound and reflects it back. Treating it reduces the build-up at the listening end of the room.
- The ceiling midpoint. For a recording or listening space, a panel on the ceiling directly above the halfway point between source and listener tackles the ceiling reflection, which is usually the next most important one after the side walls.
- Remaining wall area. Once the key points are covered, spread any extra panels across the rest of the room rather than bunching them in one place.
A note on bass
Bass buildup in corners is a real problem in small rooms and home studios, and it is worth being straight about: Swift will not fix it. At 40mm, Swift absorbs mid and high frequencies well but does little at low frequencies, so it is not a bass trap. If boomy bass is a significant issue, you need dedicated bass trapping (large, deep absorbers in the floor-to-ceiling corners) alongside your wall panels, not instead of them. This is not a Swift shortcoming; almost no standard 40mm wall panel is a bass trap. Better to set that expectation now.
Where Swift works best: treating different rooms and spaces
The placement principles are the same everywhere, but the priorities shift by room. Here is how to think about the common ones.
Home studio (recording). Prioritise the side wall first reflection points and the wall behind the mic, then add a ceiling panel above the recording position if you can. You want the room to add as little of itself to the recording as possible. If you are kitting out a dedicated space, our recording studio acoustics page covers what a fuller treatment looks like.
Podcast or video setup. Treat the three walls around your recording position (behind you and both sides), and add a panel on the wall you face if the camera picks up room echo. The goal is to lose the flutter that makes voices sound hollow.
Home office or meeting room. Focus on the wall behind the screen and the two side walls at desk height, and add ceiling treatment in taller or larger rooms. Here it is about comfort and being heard clearly on calls. For workplace and meeting spaces, see office acoustics and conference and meeting room acoustics.
Dining rooms and open-plan living. These are the classic hard-surface, high-echo spaces where several people talking turns into a wall of noise. Treatment here is about comfort more than technical accuracy, so target the largest wall areas and any wall opposite a hard floor or glass. The same thinking applies at home generally, covered on our home and domestic acoustics page.
Small hospitality and retail. Cafes, restaurants, and shops live and die on how they sound when they are busy. Swift is an easy way to soften a hard, echoey space without a shutdown or a big install. See cafe acoustics, restaurant acoustics, and retail acoustics for space-specific guidance.
Community and hospitality venues. Village halls, church halls, and hotels are often treated by volunteers or in-house teams rather than contractors, which suits a self-adhesive panel well. Have a look at village hall acoustics, church hall acoustics, and hotel acoustics.
Bigger or specialist spaces. Some rooms are better handled with a fuller specification than a DIY self-adhesive job. Schools, lecture halls, libraries, sports halls, and gyms usually need more coverage, more durable panels, or a designed scheme, and swimming pools bring humidity that self-adhesive backing does not love. If that is your project, start with the relevant space page and talk to us: school and classroom acoustics, lecture hall acoustics, library acoustics, sports hall acoustics, gym acoustics, and swimming pool acoustics.
Not sure which panel suits your space? The acoustic panel buyer’s guide covers the whole Songbird range, including when Swift is right and when another panel serves you better.
Step-by-step installation
Once the surface is prepped and the layout is planned, fitting the panels is quick.
- Mark your positions. Lightly pencil the position of each panel. Use a spirit level so horizontal rows are level; a small tilt is invisible on one panel but obvious across a run of three or four. For ceiling panels, a chalk line or laser level helps.
- Do a dry run. Before you peel anything, hold or prop every panel in place to check the layout. Adjusting now is easy; adjusting after the adhesive has grabbed is not.
- Check the temperature again. Confirm the room is at least 15°C. Cold adhesive on a cold wall bonds poorly, and that is a leading cause of panels dropping later.
- Peel the backing carefully. Remove the backing paper without touching the adhesive; skin oils weaken the bond. If you do touch it, wipe it gently with an isopropyl alcohol wipe and let it dry before carrying on.
- Position and press. Line the panel up with your marks and press firmly from the centre outwards, working even pressure across the whole face for at least 30 seconds. Pay attention to the edges, because the perimeter is where lifting starts.
- Apply firm pressure and let it cure. Give each panel firm, even pressure for at least 60 seconds. Where you can, leave the panels undisturbed for 24 hours while the adhesive fully cures, and resist the urge to tug or test them in that window.
- Step back and check. With everything up, look at the layout from a few points in the room. Small corrections, like a panel slightly off level, are far easier to sort straight away than later.
Ceiling installation: can you use Swift overhead?
Yes, Swift goes on ceilings as well as walls, but treat ceiling work with more care. Gravity is working against the bond the whole time, and a panel coming down from a ceiling is a bigger deal than one sliding off a wall.
Ceiling installation suits smooth, well-prepared painted plasterboard in good condition, modest panel sizes, and rooms where temperature and humidity stay steady. Surface prep matters even more here: clean, dry, sound paint, correct temperature, no shortcuts. If you have any doubt about the surface, do not force it.
Pressing panels overhead is awkward, so use a roller or a padded board to push firmly up across the face for at least 60 seconds per panel. For ceiling installs we recommend applying an additional spray adhesive to both the panel back and the ceiling before fitting, on top of the self-adhesive backing, for a more secure bond. This is worth doing for any ceiling panel, and especially over a working or sleeping area.
One limit to be clear about: Swift is not made to be suspended as ceiling rafts or baffles. If you want hanging treatment for a large or high-ceilinged room, Finch and Skylark are designed for suspension with standard systems.
For suspended ceiling rafts or baffles, which give more flexibility in large or high rooms, see the Finch and Skylark panels.
Common mistakes and how to avoid them
Skipping surface prep. The number-one cause of panels falling off. Even a wall that looks clean holds enough dust and grease to weaken the bond. Wipe every surface and let it dry. It takes ten minutes and almost everyone skips it.
Fitting in a cold room. Cold adhesive does not grip. Let the room and the panels reach room temperature first. If the panels have been sitting in a cold van or garage, bring them inside for a couple of hours before you start.
Placing panels randomly. Buying a dozen panels and spreading them evenly feels sensible and gives poor results. The first reflection points, the wall behind the source, and the ceiling midpoint are what count. Even coverage leaves those untreated while wasting panels elsewhere.
No dry run. Position everything before you peel anything. The dry run exposes gaps, asymmetry, and panels that do not sit as expected, without the pressure of live adhesive. Moving a panel after it has grabbed is difficult and can tear the fabric face.
Expecting wall panels to fix bass. Standard 40mm panels handle mid and high frequencies, not the low-end boom that plagues small rooms. If bass is the issue, you need bass trapping in addition to wall panels.
Treating only one wall. A classic studio error is loading the back wall behind the recording spot and ignoring the rest. That gives you a lopsided room with its own problems. The side walls, and the first reflection points especially, need treating too.
Over-treating. More is not better past a point. A room with too much absorption sounds dead and closed-in, and recordings go flat. Aim for controlled and comfortable, not silent. Start with the minimum, then add if the room still needs it.
What to expect after installation
Give it 24 hours before you judge anything. The adhesive is still curing and the panels are not fully bonded yet.
The change is usually obvious to anyone who knew the room beforehand. The clearest tell is the flutter echo going away: clap after treatment and the ring is gone. Recordings sound drier and more controlled.
Some things will remain. Wall panels do not address low-frequency bass, they do nothing for sound coming through walls from outside or next door, and a large or very hard room may keep a little reverberation. That is normal.
Give it a week of real use before deciding whether to add more. Treatment is cumulative, so you can always top up. If you record, capture a test take in the same spot before and after; the comparison is usually striking and is the most honest way to measure the improvement.
Keep an eye on the panels through the first month, especially ceiling panels and any panel in a room that swings hot and cold. If you spot an edge starting to lift, deal with it promptly by re-applying adhesive before it spreads.
Why choose Songbird by NOVA Acoustics
Swift is a Class A acoustic panel that anyone can fit. But Songbird is not a generic panel brand bought in and rebadged. It is NOVA Acoustics’ own range, specified by a team that also runs acoustic surveys, designs treatment for commercial buildings, and tests sound insulation for building regulations. That background sits behind every panel.
Class A, no compromise. Swift hits Class A absorption under EN ISO 11654, the same standard as the Songbird panels used in commercial, education, and healthcare projects. Choosing the self-adhesive format costs you nothing in performance.
Self-adhesive without cutting corners. A lot of stick-on acoustic products are foam-based, sit in lower performance classes, and do not last. Swift is a 40mm fabric-wrapped panel with a factory-applied, properly tested adhesive backing, built for genuine DIY use rather than the budget end of the market.
Backed by real consultancy. NOVA Acoustics is a UKAS-accredited testing laboratory and consultancy (Lab No. 8568) with offices across England. The Songbird range is specified with the same rigour as our commercial work, and if you ever hit a problem that goes beyond what DIY treatment can solve, our consultants are a phone call away.
Room to grow. Swift is the right place to start. If your needs change later, a permanent install, a bespoke size, a different finish, the rest of the range (Skylark, Robin, Finch, Warbler) covers it, all at Class A.
Ready to start? Browse the Swift panel, or get in touch if you want a hand working out which product suits your space.
Frequently asked questions
Can I install acoustic panels without drilling?
Yes. Swift by Songbird uses a factory-applied self-adhesive backing: peel, position, press. No drilling, no rawl plugs, no tools. It suits smooth painted plaster, painted plasterboard, and most standard interior wall surfaces.
Will self-adhesive acoustic panels damage my walls?
On most well-painted plaster and plasterboard, Swift comes off without damage if you peel slowly at a low angle, and any residue usually lifts with a suitable adhesive remover. As with any adhesive product, results on wallpaper, delicate paint, or unusual surfaces can vary, so test a hidden area first if you are unsure.
How many acoustic panels do I need?
As a starting point, panels covering 15 to 25 percent of the total wall and ceiling area will make a clear difference in most rooms. For a typical home studio or meeting room, 12 to 20 standard panels is a sensible start. Placement matters more than quantity; see the placement section above.
Do acoustic panels work on ceilings?
Yes, on smooth, well-prepared ceilings, but ceiling work needs more care than walls because gravity works against the bond. Press firmly upward for at least 60 seconds per panel, and apply an additional spray adhesive to the panel and ceiling for a more secure hold. For suspended rafts or baffles, Finch or Skylark are the better choice.
Do acoustic panels reduce noise from outside or from neighbours?
No. Panels absorb sound inside the room they are fitted in. They do not reduce sound passing through walls, floors, or ceilings, which needs structural soundproofing (mass, decoupling, airtightness), a completely different job. If you need to cut noise between rooms, speak to a specialist.
What are first reflection points and why do they matter?
They are the spots on the side walls and ceiling where sound from a speaker or voice bounces off the wall straight back to where you sit. Because that reflection lands just after the direct sound, it muddies what you hear. Panels at these points give a bigger improvement than the same panels anywhere else, and the mirror trick above is a simple way to find them.
Will acoustic panels fix the boomy bass in my room?
Standard 40mm panels, Swift included, handle mid and high frequencies but do little at low frequencies. Bass buildup in corners needs dedicated bass traps: large, deep absorbers in the floor-to-ceiling corners. If bass is a real problem, add bass trapping alongside your wall panels rather than expecting the panels to do it.
How long does installation take?
A straightforward job of 12 to 16 panels usually takes one to two hours including prep. The surface has to dry fully first, so allow at least 30 minutes after cleaning, and leave the panels undisturbed for 24 hours afterwards while the adhesive cures.
Summary
You do not need specialist knowledge or tools to treat a room. The two things that make or break the result are surface prep and placement, not how many panels you buy. Clean and dry the surface properly, then put panels where they do the most good.
Swift by Songbird is built for exactly this: Class A performance, self-adhesive, no tools. Peel, position, press.
And placement is where the real gains are. Panels at the side wall first reflection points, behind your sound source, and at the ceiling midpoint will beat more panels scattered at random, every time. Start with the key points, live with the room for a week, and add more only if it still needs it.
Ready to treat your room? Start with the Swift panel, or explore the full Songbird range if you need bespoke sizes, a wider colour choice, or a fixed installation.
Sources
- NOVA Acoustics, Sound absorption vs sound insulation: what’s the big difference?
- NOVA Acoustics, Principles of building acoustics
- NOVA Acoustics, Comprehensive guide to acoustic wall panels
- NOVA Acoustics, How to choose acoustic panels: buyer’s guide
- NOVA Acoustics, Do I simply add mass to soundproof walls and floors?
- NOVA Acoustics, How to install resilient bars
- BS EN ISO 11654:1997, Acoustics: Sound absorbers for use in buildings, rating of sound absorption (sound absorption classes A to E).
- Swift product specification and adhesive system, Songbird by NOVA Acoustics (confirm current spec at the Swift product page).
Recent posts

A Construction Noise Management Plan (CNMP) sets out how a construction project will identify, assess and control the noise and vibration affecting nearby sensitive receptors: residents, schools, healthcare facilities and businesses. CNMPs are usually required as a planning condition on major projects, as part of a Section 61 consent application, or as a procurement requirement from developers and clients.

In recent years, the knowledge that noise at work can cause permanent and disabling hearing damage has impacted the design and construction of workplaces in the UK, especially those where manufacturing processes are part of the day-to-day activity.